
BEFORE YOU START CUSTOMIZING
If you plan to make some modifications to the code of the theme, will be better to make them via the child theme. If you make modifications directly to the parent theme, you will lose them when the theme is updated. When you make modifications inside of the child theme instead, you can update the parent theme without losing any change you have made.
Child theme you’ll find in a “socifyt-child.zip”.
More information about child themes you can find in WordPress Codex- Child_Themes.
Install Theme
To install this theme it is essential to have a working version of WordPress already installed. For the information about WordPress platform installing, please see the WordPress Codex. After you download the “socifyt.zip” file from Themeforest you will have all the necessary files . Then you should extract the “socifyt.zip” file and you will find the theme zip file called “socifyt.zip”inside. You need to install this file.
- documentation
- Licensing
- theme
- socifyt.zip Theme file
- README FIRST.html
You can install the theme in two ways: via WordPress, or via FTP. If you have trouble installing the theme via WordPress, please proceed with installing it via FTP and the problem will be solved. Follow the steps below to install via WordPress.
- Log in to the WordPress Administration
- Go to “Appearance › Themes › Add New › Upload Theme”
- Browse and select theme zip folder called “socifyt.zip” (is located inside of downloaded zip package)
- Press INSTALL NOW button
- Activate theme with Activate link
Install via FTP
- Log into your hosting space via an FTP software
- Unzip the theme/socifyt.zip file and use the extracted socifyt theme folder
- Upload the extracted socifyt theme folder into wp-content themes in your wordpress installation
- Activate the newly installed theme. Go to Appearance Themes and activate the installed theme.
- ftp folder
- wp-includes
- wp-admin
- wp-content
- themes
- socifyt
- themes
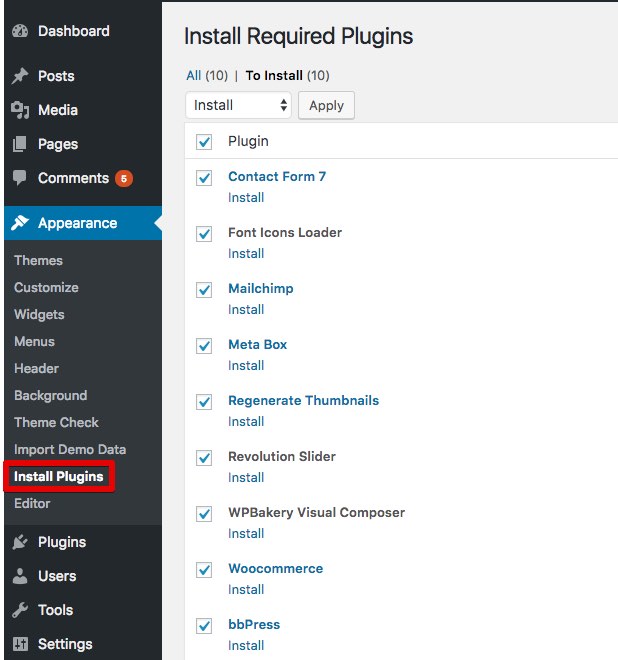
Required Installation
TO ADD THE NEEDED FUNCTIONALITY TO THE THEME IS NECESSARY TO ACTIVATE THE REQUIRED PLUGINS.
- Go to “Appearance › Install Plugins”
- Install and activate required plugins
One click import
You can either start building your site from scratch, or import one of our demo sites and then modify it to fit your needs. We will now explain how to do the latter.
socifyt comes with one-click import module. Here’s what you need to do:
- Login to WordPress admin
- Go into admin panel > socifyt > Demo install
- Choose the demo site that you wish to import and click on the “Import Demo Data” button.
Import troubleshooting
Many issues that you may run into such as; white screen, demo content fails when importing, empty page and other similar issues are all related to low PHP configuration limits.
The solution is to increase the PHP limits.
You can do this on your own .
- Find the php.ini file in your Server config files.
- For WAMP, its in apache2/bin/apache2.2.22/bin/php.ini
- Go to the line “max_execution_time=30” .
- Change it to 360 or any other large value.
Or contact your web host and ask them to increase those limits to a minimum as follows
- max_execution_time 360
- memory_limit 128M
- post_max_size 32M
- upload_max_filesize 32M
Demo Migration
This video installation guide our demo content via admin panel of your site using module All in one WP migration . Please make sure you have installed the plugins All-in-One WP Migration Dropbox Extension (wp repository) and All-in-One Url Extension . After demo import, you can disable these plugins .
This is a complete installation of your database which will result in the loss of your data .
New access to the admin panel will:
user:admin
password:change_me
Demo Content Url
https://assets.templines.com/plugins/theme/socify/mysocify.wpress
Video Tutorials
The purpose of this video is to show you how to install both theme and theme plugins. The installation process is quite straightforward and easy to follow. In case you encounter any difficulty while installing, you can always refer back to this video and follow the steps shown to successfully install the theme and plugins. Additionally, if you have any queries related to the installation, feel free to reach out for assistance.
The purpose of this video is to show you how to install both theme and theme plugins. The installation process is quite straightforward and easy to follow. In case you encounter any difficulty while installing, you can always refer back to this video and follow the steps shown to successfully install the theme and plugins. Additionally, if you have any queries related to the installation, feel free to reach out for assistance.
Auto-Updating
The Envato Market plugin can install WordPress themes and plugins purchased from ThemeForest & CodeCanyon by connecting with the Envato Market API using a secure OAuth personal token. Once your themes & plugins are installed WordPress will periodically check for updates, so keeping your items up to date is as simple as a few clicks.
You can add a global token to connect all your items from your account, and/or connect directly with a specific item using a singe-use token & item ID. When the global token and single-use token are set for the same item, the single-use token will be used to communicate with the API.
Manual Updating
You can update your theme manually by performing the following steps:
- Download the latest theme zip file from ThemeForest
- Extract it and locate socifyt.zip
- Extract socifyt.zip and locate the socifyt folder
- Copy/Replace content of the socifyt folder to the /wp-content/themes/socifyt folder of your web site.