
We also provide paid services for custom working with the theme or installation . You can order it on services page . We can help you with the paid installation of your WordPress site and our template including the import of demo content .
BEFORE YOU START CUSTOMIZING
If you plan to make some modifications to the code of the theme, will be better to make them via the child theme. If you make modifications directly to the parent theme, you will lose them when the theme is updated. When you make modifications inside of the child theme instead, you can update the parent theme without losing any change you have made.
To create child theme and transfer all settings from the parent theme to the child theme , please use Child theme configurator .
More information about child themes you can find in WordPress Codex- Child_Themes.
If your changes are not critical and affect only the styles , and you do not have enough settings that come with our theme then you can use the yellow pencil for these purposes . More info about Yellow Pencill
Also you can use our paid service to hire our team and make your website according to your requirements .
Install Theme
To install this theme it is essential to have a working version of WordPress already installed. For the information about WordPress platform installing, please see the WordPress Codex. After you download the “package.zip” file from Themeforest you will have all the necessary files . Then you should extract the “package.zip” file and you will find the theme zip file called “keymoto.zip”inside. You need to install this file.
Please Note: You can install the theme in two ways: via WordPress, or via FTP. If you have trouble installing the theme via WordPress, please proceed with installing it via FTP and the problem will be solved. Follow the steps below to install via WordPress.
- Navigation > Appearance >Themes.
- Click Install Themes and press the upload button.
- Navigate to find the “keymoto.zip” file on your computer and click “Install Now” button.
- The theme will be uploaded and installed.
- Activate the newly installed theme. Go to Appearance > Themes and activate the installed theme.
- Navigation > Appearance >About keymoto.
- After theme activation, you will see all the required plugins to be installed . Please install all required plugins ( you can disable unnecessary later ) .
- Now you can import the demo
Install via FTP
- Log into your hosting space via an FTP software
- Unzip the keymoto.zip file and use the extracted keymoto theme folder
- Upload the extracted keymoto theme folder into wp-content themes in your wordpress installation
- Activate the newly installed theme. Go to Appearance Themes and activate the installed theme.
- Navigation > Appearance >About keymoto.
- Activate theme using purchased code ( If you are using a development site, you can deactivate your code to move your site to the main domain . )
- After theme activation, you will see all the required plugins to be installed . Please install all required plugins ( you can disable unnecessary later ) .
- Now you can import the demo
One click import
You can either start building your site from scratch, or import one of our demo sites and then modify it to fit your needs. We will now explain how to do the latter.
keymoto comes with one-click import module. Here’s what you need to do:
- Login to WordPress admin
- Go into admin panel > keymoto > Import Demo Data
- Click on the “Import Demo” button.
If you get any error, please use our support forum
Import troubleshooting
Many issues that you may run into such as; white screen, demo content fails when importing, empty page and other similar issues are all related to low PHP configuration limits.
The solution is to increase the PHP limits.
You can do this on your own .
- Find the php.ini file in your Server config files.
- For WAMP, its in apache2/bin/apache2.2.22/bin/php.ini
- Go to the line “max_execution_time=30” .
- Change it to 360 or any other large value.
Or contact your web host and ask them to increase those limits to a minimum as follows
- max_execution_time 360
- memory_limit 128M
- post_max_size 32M
- upload_max_filesize 32M
Theme Settings
To configure the main theme settings , go to the Appearance – Customizer

motorbikes settings
motorbikesdeal Site Settings
- Login to WordPress admin
- Go into admin panel motorbikess > Settings > General Settings
- Site currency – site currency
- Thousand Separator – Thousand separator for price
- Decimal Separator – Decimal separator for price
- Number of Decimals – Number separator for price
- My motorbikess page – motorbikesdealer motorbikes page
- motorbikes listing page – motorbikes listing page
- List style – style for motorbikes listing page
- Sell your motorbikes page – add motorbikes dealer page
- Update motorbikes page – update motorbikes dealer page
- Text After Price – separator for price
- Slider max price – listing max price slide settings
- motorbikess per page – separator for price
- motorbikess order – motorbikes orders
- Show disabled equipment – equipment settings
Site Currencies
- Login to WordPress admin
- Go into admin panel motorbikess > Settings > General Settings > Currencies
Fields Setting
- Login to WordPress admin
- Go into admin panel motorbikess > Settings > General Settings > Fields
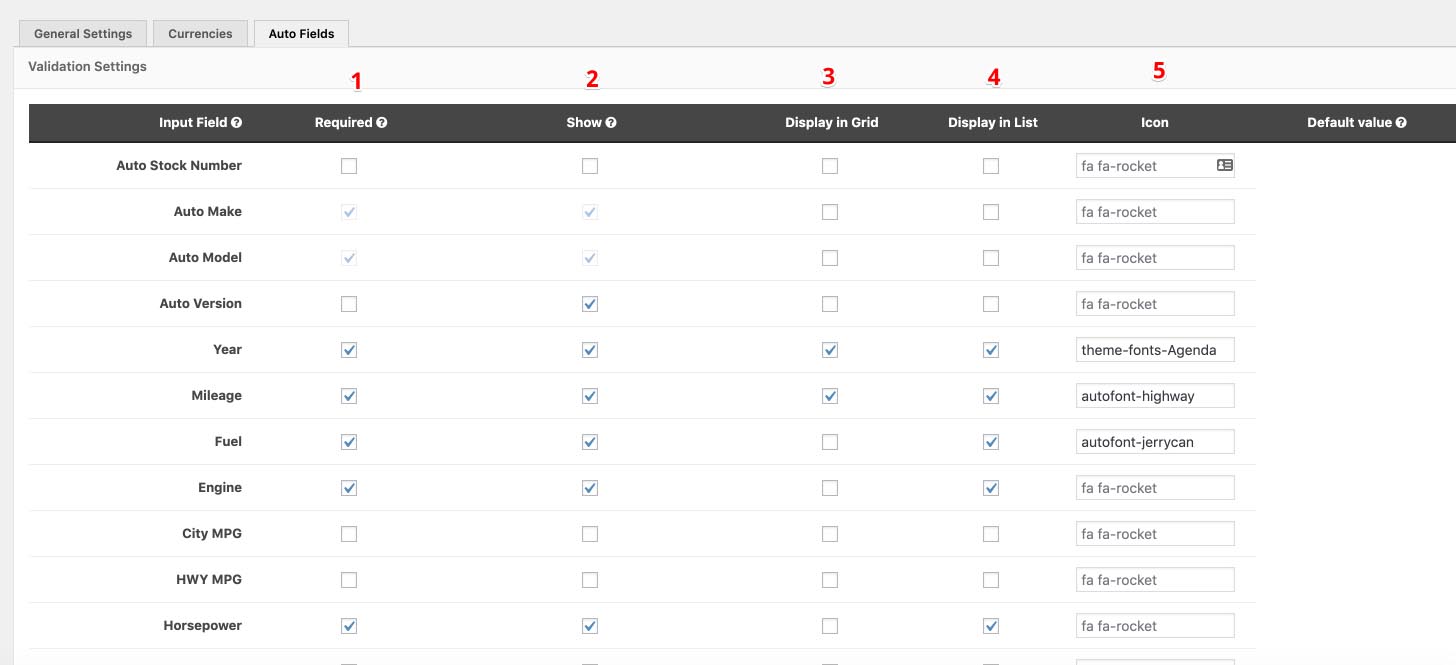
1. Required – Check this if you want this field to be marked as required when users adding new motorbikess.
2. Show – Check this if you want to show this field to be visible on motorbikess page & add / edit motorbikes frontpage.
3. Display in Grid – Check this if you want this field to be marked in Catalog Grid.
4. Display in List – Check this if you want this field to be marked in Catalog List.
5. Icon – Add icon in Grid fields , all avaible icons in Appearance – Font icon loader
Custom Fields Setting
You can use any additional fields to customize your motorbikes . They will be applied to the main fields on the machine page as well as the catalog page .
- Login to WordPress admin
- Go into admin panel motorbikess > Settings > General Settings > motorbikes Fields – Custom Settings – Group
Please select add to tab if you want to separate these additional fields and add them to tabs in motorbikes page .
Compare options
- Login to WordPress admin
- Go into admin panel motorbikess > Compare page
To see all available motorbikess
- Login to WordPress admin
- Go into admin panel motorbikess > All motorbikess > Published
To add a new motorbikes
- Login to WordPress admin
- Go into admin panel motorbikess > New motorbikes
To add new motorbikes Model
- Login to WordPress admin
- Go into admin panel motorbikess > Model > Add motorbikes Model
Model list will be available in the motorbikes settings
To add new Body Style
- Login to WordPress admin
- Go into admin panel motorbikess > Body Style > Add Body Style
Body Style will be available in the motorbikes settings
To add new motorbikes Equipment
- Login to WordPress admin
- Go into admin panel motorbikess > Equipment > Add Equipment
motorbikes Equipment will be available in the motorbikes settings
Add new Listing page
- Add new Page
- Go to Page attribute – Template
- Select – Listing Page
- Go to Purposes
- Select Purpose
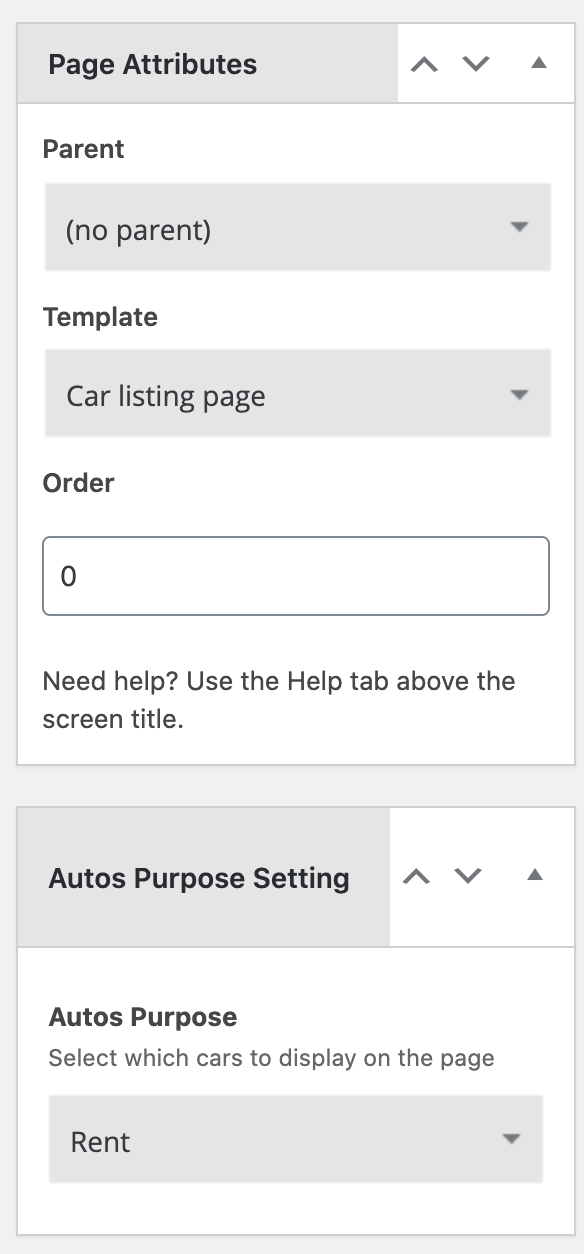
When editing the motorbikes, specify the motorbikes purpose .

Add Custom Icons
In this video you will learn how to add custom icons to the Elementor Page Builder and Theme Keymoto.
You need install this plugin Custom Elementor Icons .
Group and Users
Google Maps
You can add a Google map using the Google Maps element .
Please create your own API key for Google maps . Follow these steps to get an API key:
- Go to the Google Cloud Platform Console.
- Create or select a project.
- Click Continue to enable the API and any related services.
- On the Credentials page, get an API key. Note: If you have an existing unrestricted API key, or a key with browser restrictions, you may use that key.
- From the dialog displaying the API key, select Restrict key to set a browser restriction on the API key.
- In the Key restriction section, select HTTP referrers (web sites), then follow the on-screen instructions to set referrers.
- (Optional) Enable billing. See Usage Limits for more information.
For more information on using the Google Cloud Platform Console, see API Console Help.
Add this key in Customizing – General – Apikey
Jivo Chat
You can add your chat using Jivochat service . To do this, register on site Jivochat and get the code that you need to add to Kaswara-Settings .
WPbakery
WPbakery gives you instant access to built in content elements. Each content element has been motorbikesefully crafted and offers multiple options that will enable you to build any layout you desire. You can build complex layouts based on these content elements within minutes, and without requiring a single line of code. Please check this video tutorial:
- Documentation: kb.wpbakery.com
- Video tutorials: vc.wpbakery.com/video-tutorials
You can use these plugins with the keymoto theme and you are fully compliant with the Envato’s policy, but you cannot activate them as the owner (so don’t try to use the keymoto purchase code to activate one of these plugins).
When you purchase a theme from ThemeForest that bundles WPbakery and Revolution Slider, you are free to use these Premium plugins with the theme. However, your keymoto purchase does not give you individual WPbakery and Revolution Slider licenses that allow you to activate or download these plugins as you wish. Activation doesn’t mean the plugin will not work but only that you cannot receive direct updates. Please don’t worry if you see warning messages about the plugin license activation.
To update you need:
- Navigate to the Plugins menu in your WordPress admin area.
- Deactivate revolution slider, delete it
- Go to Install Required Plugins
- Upload and install the new version
- Activate WPbakery.
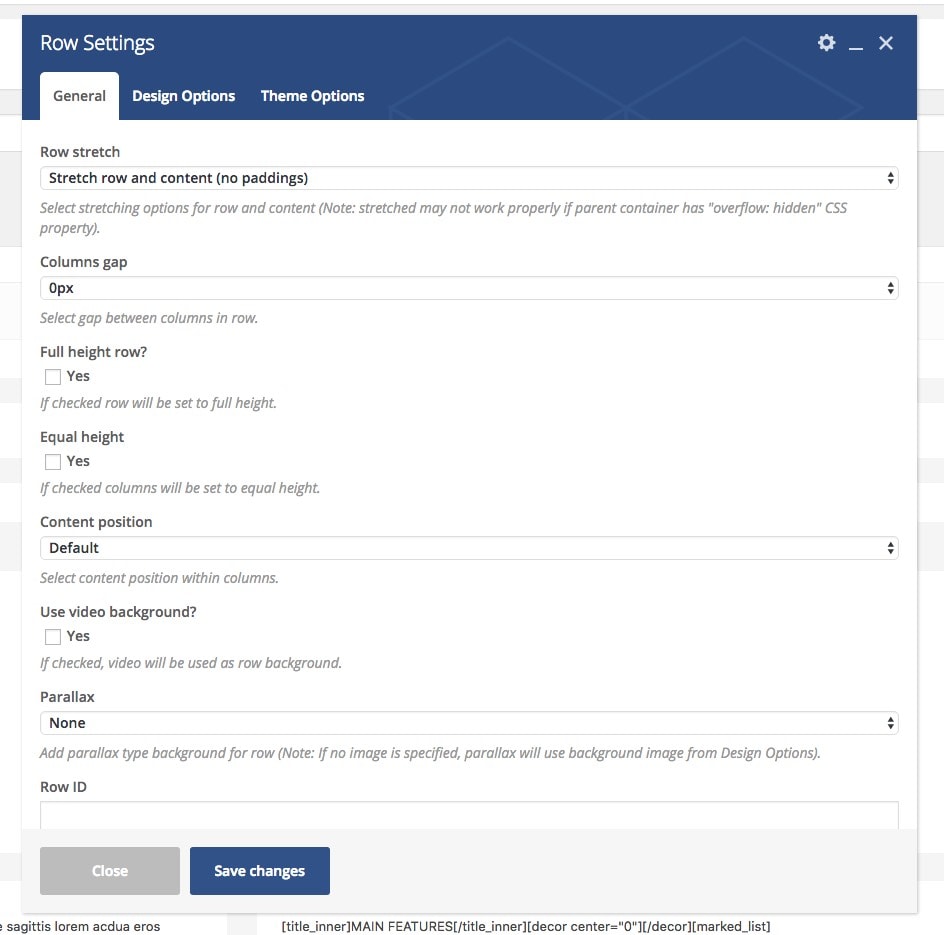
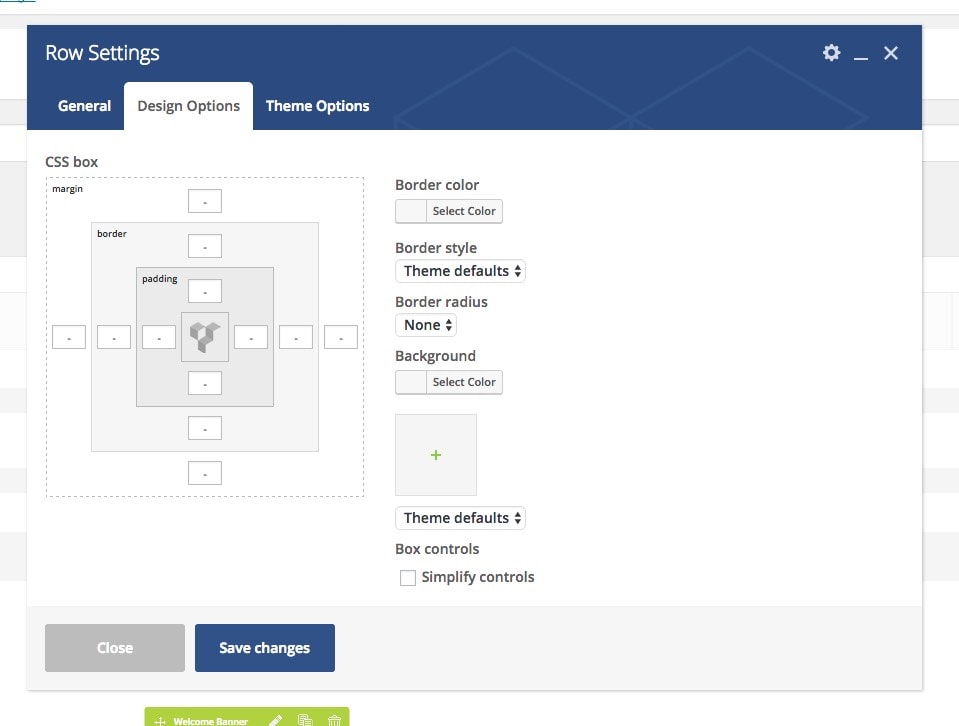
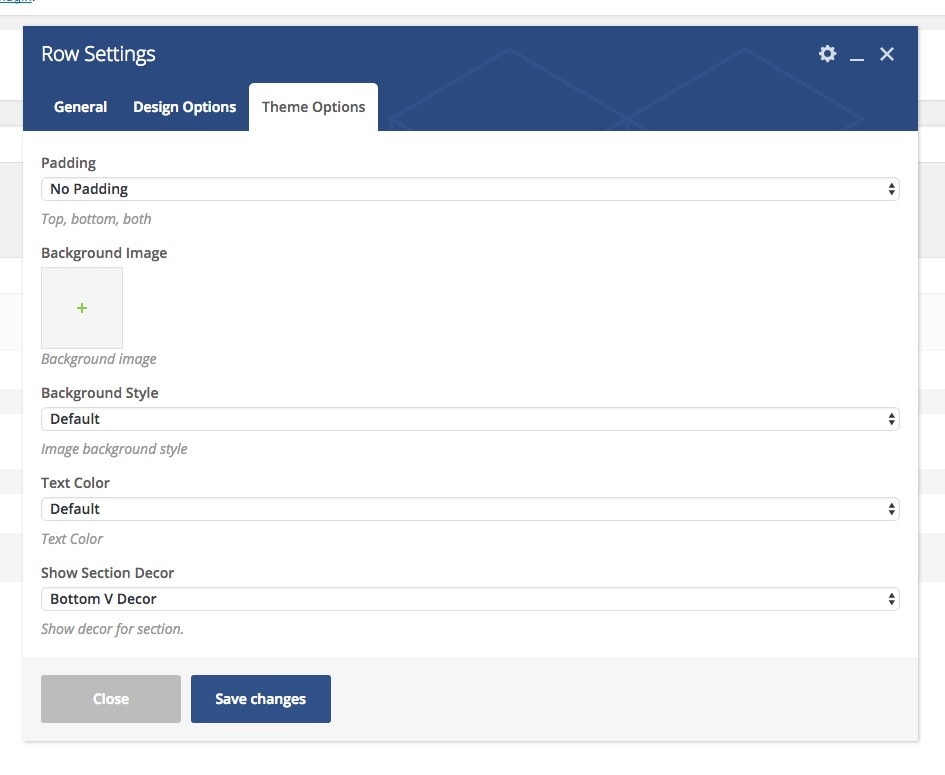
Row Settings
To create a new unique section use default row settings and also theme row options .

Revolution slider
First please import all the slides from a folder DemoContent/Revoslides using Revoslider import
- Documentation: slider-revolution-documentation
Documentation: https://templines.com/go/revslider-doc/ Video tutorials: available on YouTube
If you are unfamiliar with this awesome plugin, we recommend that you use the online documentation
You can use these plugins with the keymoto theme and you are fully compliant with the Envato’s policy, but you cannot activate them as the owner (so don’t try to use the keymoto purchase code to activate one of these plugins).
When you purchase a theme from ThemeForest that bundles WPbakery and Revolution Slider, you are free to use these Premium plugins with the theme. However, your keymoto purchase does not give you individual WPbakery and Revolution Slider licenses that allow you to activate or download these plugins as you wish. Activation doesn’t mean the plugin will not work but only that you cannot receive direct updates. Please don’t worry if you see warning messages about the plugin license activation.
To update you need:
- Navigate to the Plugins menu in your WordPress admin area.
- Deactivate revolution slider, delete it
- Go to Install Required Plugins
- Upload and install the new version
- Activate slider.